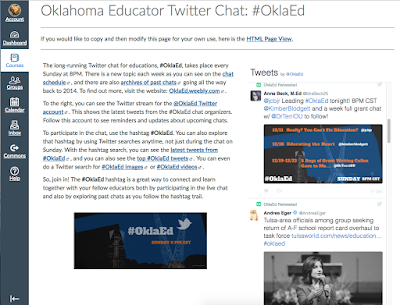
Sharing a Page. Let's say, though, that you want to share not just a widget but the entire Page containing the table with both the widget and the contextualizing information. Maybe, for example, you want to create a Page with your departmental Twitter plus additional departmental information: a link to the website, a graphic from the website, contact information for the personal managing the Twitter account, etc. You could then encourage faculty members in the department to add that Page to their own Canvas space. As a demonstration, I created this #OklaEd Chat Page that I thought might be something Education faculty would want to share and promote with their students:

Canvas Commons. Of course, one way to share the Page is through the Canvas Commons. This is a very powerful way to share in Canvas, and it even offers a versioning system so that if/when you create a new version of the Page, notices are sent out to users who have copied the Page, alerting them to the new version. For details on how to use the Canvas Commons, see the Canvas Commons Guide.
HTML Sharing. There is also a quick-and-easy way to share a Canvas Page, though, and that is what I am going to explain here: HTML Sharing. Especially if your Page will be of interest to only a limited audience with whom you are already in direct contact (e.g. faculty in your department), this quick-and-easy method might be all you need.
Sample Page. To get started, take a look at the #OklaEd Chat Page, which features the #OklaEd Chat Twitter widget plus additional information about the chat: #OklaEd Chat Page. To share the Page, I then created an additional Page which displays the raw HTML code, which you can see here: #OklaEd Chat HTML. To copy the page, all someone has to do is highlight and copy the HTML from that page, and then paste it into their own Canvas Page. That's it: all done! It just takes a few minutes to create the HTML page for sharing, and it also just takes a few minutes for anyone to grab the HTML code to use for their own Page.
Here are the step-by-step instructions you need:
For Content Creators: Instructions for Creating the HTML Page. These are the steps you follow to create the HTML version of the Page you want to distribute.
For Content Users: Instructions for Copying the HTML Page. These are the instructions your faculty would follow to add the page to their course; I've also included instructions on the admittedly odd way you add Pages to your course menu.
I hope this will be useful for any OU departments and programs that want to use Canvas as a way to distribute content throughout the course network, increasing the reach of your Twitter account.
Of course, this method works for ANY kind of Canvas Page that you want to distribute, even just a static page without a widget. By making the HTML easily available to your faculty, they can then copy-and-paste the contents of the page, including all images and formatting. The resulting page is something that they can then include in their own course menu, and they can also tweak the contents of the page for their own purposes as needed.
No comments:
Post a Comment